


Showing posts with label Lesson. Show all posts

Layers and UCS | Autocad 3D

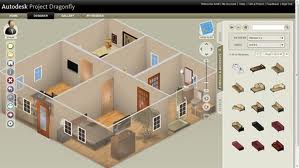
In this lesson, i will tell about how to make everything that we draw is under our control. Layers dan UCS are the topic today. As we know sometimes we will do some complicate home work that make our head get headache. For example when we want to draw a house, there are so many thing that we want to draw (window, door, bed room, roof, bath room, etc). So, to manage all of this we need some controling.

1. Layers
To make everything easy and simple to do, we have to manage what we want to draw by using layer properties manager. Just click layer properties manager (under command 'qnew') and you will find many command. Start it by clicking command 'new'. Named it and you can also choose the colour Of layer. As you choose the colour of layer, you have choosen the colour of drawing that you want to draw. For example: first you want to draw the bed room, click 'layer properties manager' then 'new'. Named it 'bed room' and choose 'white' then begin to draw. After finish it if you want to draw the door, click 'layer properties manager' then 'new', named it 'door' and choose 'brown' (i recomended you choose a different colour in each part of drawing) then begin to draw. When you are drawing and you lose your focus because so many lines and rectang from 'bed room', you can manage it by using 'layer properties manager'. Click the arrow in the right of layer properties manager, choose 'bed room' and click the picture of lamp. 'Bed room' is hidden. that's what happenned, so now you can contionue to draw 'door' without losing your focus again. When you want to see it again just click like before.


2. UCS
Sometimes in drawing we will meet a complicate problem. For example see in lesson 2 about slice. When we want to cut a thing by using command slice, we have to create an object with a different coordinat. In this case we need command 'ucs'. Look at the picture 2.4a, there is a rectang inside the box. To make rectang we need to change the coordinat. Write command 'ucs' in the command place and enter, then write 'n' (new) and enter, after that click 3 point (it means where we gonna put x,y,z is) in the box, then draw the rectang.

Ok that's all i want to share to you about autocad 3d. I hope you can enjoy this sharing and always keep practice...
see you...
read more

Saturday, May 23, 2009 0 comments

Extrude | Slice | Union | Subtract | AutoCad 3D

In this lesson, we will learn about command that we use to draw in 3 dimension. This lesson is the main point from autocad 3 dimension, so pay attention. There are just a few of command in autocad 3 dimension that i want you to remember.
1. Extrude.
This command can be written as 'ext' in command place. This command make our drawing in 2 dimension (ex : rec= rectang) become a solid thing in 3 dimension.
For example : command rec, click in anywhere @10,10 enter then command ext enter path = 10 enter extrusion = 0 enter. We can see the result like the picture 2.1.


picture2.1

2. Subtract
This command can be found in Modify, solid editing, then click subtract. This command is used to make a new form from 2 object (the same or different form or size, it does'nt matter) by subtracting one object with another. Let see the difference from the example and the picture.

ex 1 : command 2 rectang with 2 different size (@10,10 and @5.5) put this 2 object in the same position. Then extrude both with the same size (path =10, extrusion =0). Click modify, solid editing, click subtract and select object that we want to be a new form, enter then select another one. See the result by looking at the picture 2.2a


picture 2.2a

ex 2 : command rectang (@10,10) and circle (diameter = 5). Put this 2 object in the same position then extrude both with the same size (path =10, extrusion =0). click modify, solid editing click subtract and select rectang, enter then select circle. See the result by looking at the picture 2.2b


picture 2.2b

3. Union
This command can be found in Modify, solid editing, then click union. This command is used to make a new form from 2 object (the same or different form, it does'nt matter) by unioning one object with another. Let see the difference from the example and the picture.

ex 1 : command 2 rectang with 2 different size (@10,10 and @5.5) put this 2 object in the different position but still part of them connected. Then extrude both with the same size (path =10, extrusion =0). click modify, solid editing, click union and select one object, select another one and enter. See the result by looking at the picture 2.3a.


picture 2.3a

ex 2 : command rectang (@10,10) and circle (diameter = 5) put this 2 object in the different position but still part of them connected. Then extrude both with the same size (path =10, extrusion =0). click modify, solid editing, click union and select one object, select another one and enter. See the result by looking at the picture 2.3b.


picture 2.3b

4. Slice
This command can be written as 'sl' in command place. This command make our one object in 3 dimension is separated in two object. We can separate our 3 dimension object in anywhere angle point. But first we have to create an object as the cutter, then put it in every angle point of 3 dimension that we want to separate.

for example : the object that we want to separate is the result of ex 2 union (pic 2.3b). rec enter put it in every point that we want to separate. Look at the picture 2.4a.


picture 2.4a

Then write 'sl' in command place, click objeck 3 dimension then write 'o' (for object), then click rectang and write 'b' (for keep both side). After this we can choose which side that we want to erase. See the result by looking at the picture 2.4b.


picture2.4b

All right, we finish our lesson for this day. With this 4 command, you can draw a house or machine if you want. so simple, don't you think so? I hope you can enjoy and get fun with this lesson. Have a nice day.
See you in next lesson..
read more

Sunday, May 10, 2009 0 comments

Efisiency Coordinated | AutoCad 3D

To learn about Autocad 3D, we must have a good imagination about something we want to draw. This is something thatI want everyone know before they learn about autocad 3D. In this lesson, i want to make a little explanation about coordinate. In 2D we know that there are 2 coordinate (x,y) but in 3D there are 3 coordinate (x,y,z). Is important to understand about this because to draw something we have to coordinate that thing. Not just to draw but also to make what we want to draw efisiency (e.x: copy, move etc.) for example to make a solid box, make command rec enter @8,10 then command ext enter 5 enter. If you want to copy just enter the coordinate where you want to copy
example : write command co enter @20,0,0 enter

write command co enter @0,20,0 enter


write command co enter @0,0,20 enter

look at the picture and you will know the difference
Do the same thing for the command of Move and you will see the same difference too.
Ok this is only the beginning tips and tricks how to learn autocad 3d.
see you next lesson
thanks...
read more

Friday, May 8, 2009 0 comments